19 May 2009
Summertime!
Hello, blogging world! Yes, I'm still here -- I've graduated from college and I'm still attempting to unwind and recover from the past month. I have plenty of updates looming and they will be coming soon.
16 March 2009
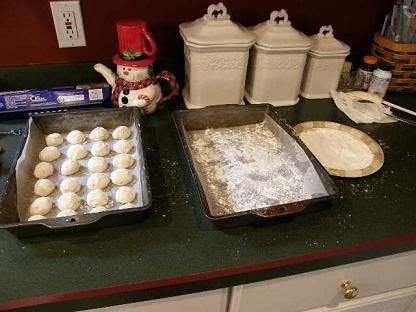
My first attempt at bagels!
I'm a big fan of good breakfast food, but I'm not talking cereal and toast. Give me pancakes, bacon, fruit & yogurt, hashbrowns, omelets - any of those make for a very happy breakfast but, unfortunately, aren't suited for a quick breakfast. When I need something quick, filling, and satisfying I go for bagels. I struggle to resist a fresh toasted bagel at work every morning and the temptation of stopping at Tim Horton's for a bagel is always there. That's what drove me toward my first Spring Break culinary undertaking - homemade bagels.
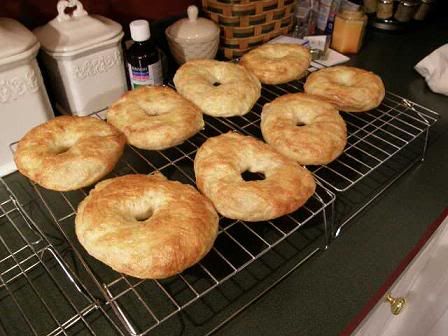
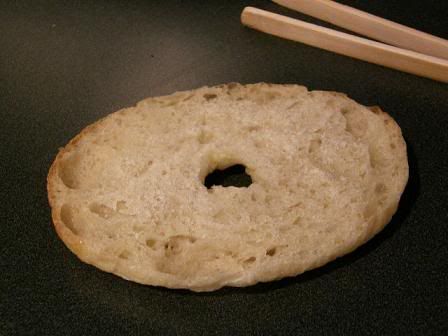
My mom was incredibly skeptical and my dad laughed at me [as usual], but I felt like they had every right to react in those ways. I'm not very experienced when it comes to working with yeast and who decides to make bagels at home? Well let me say this - I showed them! I'm definitely impressed with my finished product. Sure, they weren't as fluffy as your typical bagel, but they were delicious and had a great texture & flavor! While a bit time consuming, they weren't really that difficult to make either and I will definitely do it again. Mom and Dad enjoyed them simply toasted with butter and jelly [it always has to be Knott's at our house - my dad is a serious addict] but I used mine to make a delicious fried egg sandwich with a little cheese.
1 tbsp active dry yeast
1 tbsp sugar
1 3/4 cups water, warm (100-110F)
4-5 cups bread flour (not all purpose)
1 tbsp salt
1 egg, for egg wash
1 tbsp sugar
1 3/4 cups water, warm (100-110F)
4-5 cups bread flour (not all purpose)
1 tbsp salt
1 egg, for egg wash
Optional Seasonings:
Poppy Seeds
Onion Powder
Caraway
Sesame Seeds
Kosher Salt
Poppy Seeds
Onion Powder
Caraway
Sesame Seeds
Kosher Salt
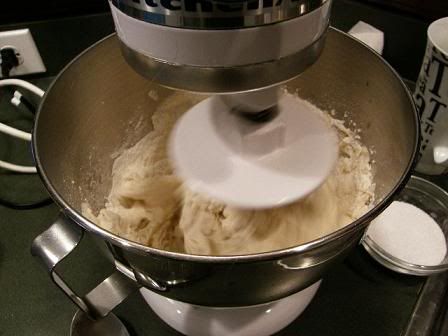
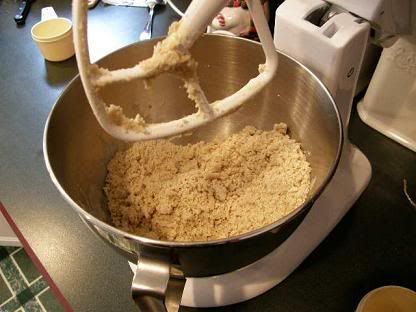
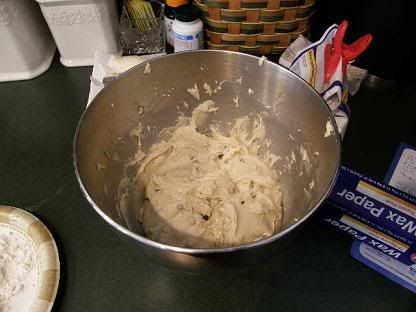
In a large bowl [or the bowl of a stand mixer, which I prefer] combine yeast, sugar and water. Let stand for 5 minutes, then stir in the flour and salt. Mix dough thoroughly until it comes together in a large ball, pulling away from the sides of the bowl. Add an additional tablespoon of flour or water, if needed. I think I should have added a little more flour at this point but I was afraid of adding too much, which made my dough sticky.
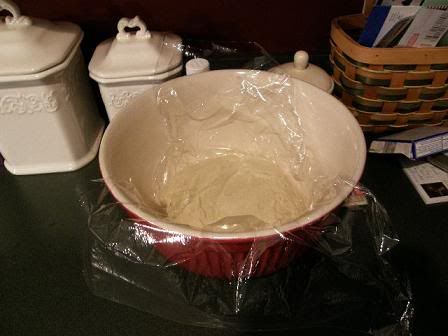
If kneading by hand, turn dough out onto a lightly floured surface and knead until very smooth and elastic, about 10 minutes. If using a stand mixer [like I did], knead the dough with the dough hook until elastic, about 8 minutes on a low speed. Place dough in a lightly greased bowl, cover with plastic wrap and let rise for 1 hour, or until doubled in size.
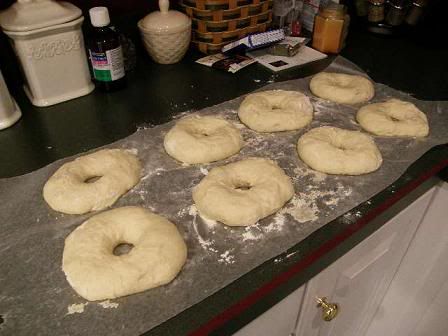
When dough has risen, turn the dough out onto a very lightly floured surface and divide into 8 equal pieces (first quarters, then halves). Shape each piece into a tight ball, pinching the corners together at the bottom of the dough. When all the balls are shaped, let the dough rest for 30 minutes covered with a clean dish towel.
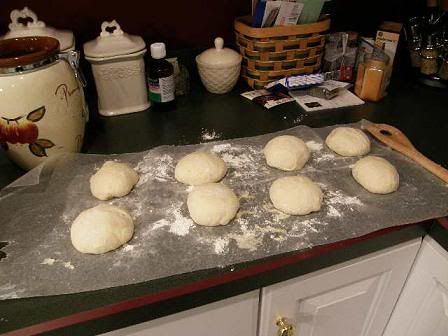
Once dough balls have rested, use your fingers to poke a hole through the center of each dough ball. Stretch out the dough into a ring with your fingers and be sure to make the hole a little larger than you want the finished bagel to have, as it will shrink slightly while the bagel is expanding during the baking process. Let bagels rest for about 10 minutes.
Once dough balls have rested, use your fingers to poke a hole through the center of each dough ball. Stretch out the dough into a ring with your fingers and be sure to make the hole a little larger than you want the finished bagel to have, as it will shrink slightly while the bagel is expanding during the baking process. Let bagels rest for about 10 minutes.
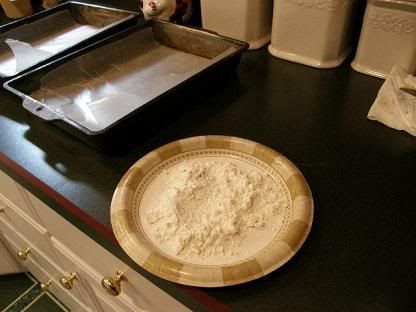
Meanwhile, bring a large pot of water to a gentle boil and preheat the oven to 400F. I used a deep dish skillet because it’s wider and the bagels need quite a bit of space. Line a baking sheet with paper towels and another baking sheet with parchment paper sprinkled with cornmeal (if you have it - I didn‘t and everything worked out fine without).
Working two to four bagels at a time (depending on what you can fit into your pot or skillet), drop the bagels carefully into the boiling water. Boil for 2 minutes on each side. Using a slotted spoon or strainer, transfer bagels to the paper towels to drain for a moment, then place on the parchment-lined baking sheet. Repeat process with remaining bagels.
Brush boiled bagels with lightly beaten egg (a pastry brush is a good tool for this) and sprinkle with seasonings. Bake for 24 minutes, or until golden brown. Cool completely on a wire rack. Slice and toast to serve.
Brush boiled bagels with lightly beaten egg (a pastry brush is a good tool for this) and sprinkle with seasonings. Bake for 24 minutes, or until golden brown. Cool completely on a wire rack. Slice and toast to serve.
I have some more updates coming soon, I promise. I'm in my last 7 weeks or so of college, so I don't have a lot of spare time for blogging. When I do get the time, expect to see bread, cupcakes, and soup!
15 January 2009
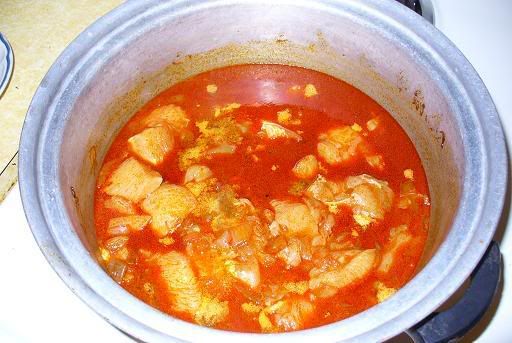
Chicken Paprikas
It's time for a change. I've been posting sweet recipe after sweet recipe and I guess I now feel the need to showcase my cooking chops.
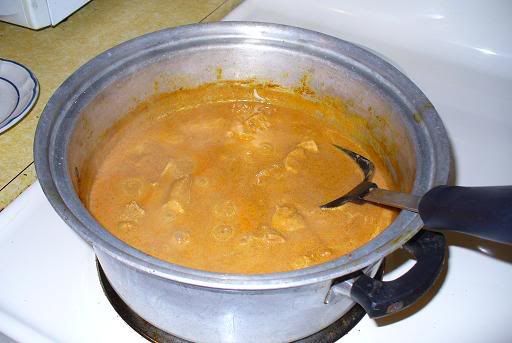
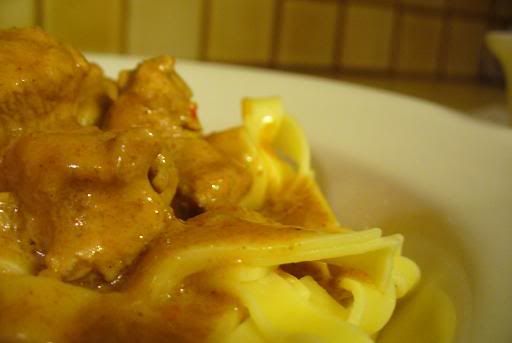
Chicken Paprikas is so much more than a meal to me. It is full of memories and makes me feel at home. My gram makes the best chicken paprikas I have ever tasted and, one day, I will get the recipe. I have so many memories of the entire family getting together at Gram's to eat heaping plates of this chicken, served over her homemade spaetzel, and visit with one another. Unfortunately, we've all gotten busier and this tradition has fallen to the wayside but it is one that I have never forgotten.
One day I was hit with an undeniable craving for this comforting, hearty meal and was quickly on a mission to make some for dinner. Bryce gladly offered up his kitchen, knowing he'd benefit from my kitchen excursion. I turned to allrecipes.com and sifted through each recipe until I found one that I felt would be a keeper. Boy, was I right. While it wasn't quite Gram's [maybe my memory is a bit biased...], it was exactly what I wanted - rich, creamy, flavorful, and comforting. I served our meal over noodles but I would definitely recommend using spaetzel if possible.
Chicken Paprikas
adapted from allrecipes.com - Chicken Paprikas II
2 tablespoons olive oil
1 large onion, diced
3 cloves garlic, diced
3/4 teaspoon salt
1 teaspoon hot sauce
3 heaping tablespoons paprika
2 pounds boneless, skinless chicken breasts, cut into 1-inch cubes
1 cup reduced sodium chicken broth
1 14.5 ounce can diced tomatoes
2 tablespoons flour
1 8 ounce container sour cream
Heat the olive oil in a large skillet over medium heat. Add the onion, garlic, salt, hot sauce, and paprika. Stir together and saute until the onions are translucent. Add the chicken and cover with the broth [add some water if chicken is not completely covered]. Stir together and cook over medium heat for 30 minutes.
Stir in tomatoes [if desired - I left them out], reserving the liquid. Stir about half of the liquid from the tomatoes with flour and sour cream in a medium bowl and mix until well blended. Slowly add mixture to the chicken, stirring constantly. Cook until thickened. Serve over noodles, rice, or spaetzel.
The dish is simple and delicious, and I highly recommend it!
07 January 2009
Paula Deen's Cookie Dough Truffles
When my mom told me about this recipe, I thought it would be love at first bite. I'm a cookie dough fanatic and dipping cookie dough in chocolate? Divine! Weeellll...they're okay. They're soft and sweet, but, believe it or not, a little too sweet for me. Now don't get me wrong - I've eaten my fair share of the truffles but I'd rather spend my calories on other cookies. Also, these require a lot of work. I'll stick with kifli if I want a labor intensive cookie.
Cookie Dough Truffles
from the kitchen of Paula Deen
1/2 cup butter, softened
3/4 cup firmly packed brown sugar
1 tsp vanilla extract
2 cups all-purpose flour
1 14-ounce can sweetened condensed milk
1/2 cup semisweet mini chocolate chips
1 1/2 pounds chocolate bark candy coating, melted
In a large bowl, cream butter and brown sugar with an electic mixer at medium speed until creamy. Add vanilla and mix. Gradually beat in flour, then add in the milk. Add in the chocolate morsels, mixing well. At this point, I put the dough in the freezer for a few hours because the dough is INCREDIBLY sticky.
Remove the dough from the freezer and shape into 1-inch balls. I coated my hands in flour before doing so and re-coated between cookie dough balls. Place the balls on waxed paper and freeze for at least 2 hours.
Melt the chocolate in a double boiler, or in a glass bowl set over a pot of gently simmering water. Using two forks, dip the cookie balls into the chocolate to cover. Place on waxed paper and chill, at least one hour, to set.
Like I said, these were pretty labor intensive and while I liked trying a new recipe I don't think I would make these again. I also saw another blogger's take on the truffles and she recommened using salted butter, which I think may help cut back on the sweetness.
Again, no pictures of the finished product. Mine didn't look that great and I'm sure I was up to my elbows in other baking at the moment. Just imagine those, but dipped in dark chocolate [which I think provided a nice, bitter contrast to the sweet dough] and kind of lumpy.
04 January 2009
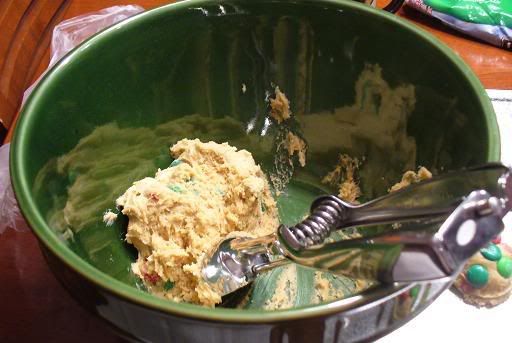
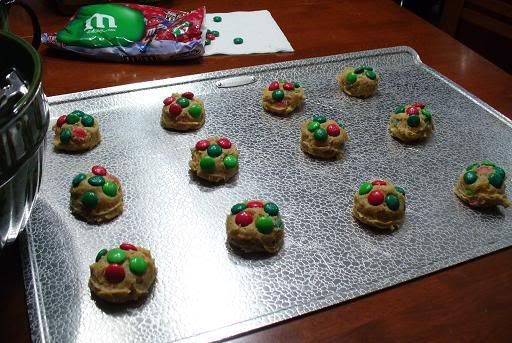
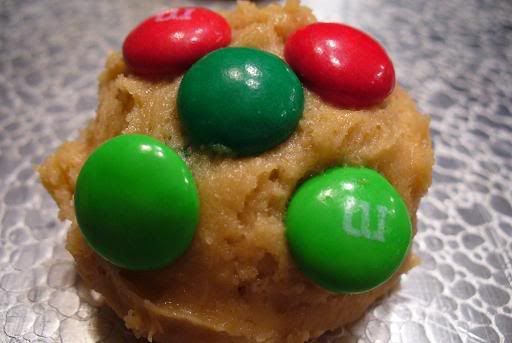
M&M Cookies
These cookies are a Christmas cookie staple in my family's house. Growing up, I always preferred the Tollhouse chocolate chip cookies but these have recently won my heart. They are buttery and soft, and the M&Ms provide a nice, chocolatey crunch. Bryce and I often argue over whose mom makes the best M&M cookies and I will stand by these time and time again. There's something special and different about these cookies which may come from the use of all brown sugar rather than granulated sugar.
Chocolate Chipper Champs [I have no idea why they are called by that name...]
from the kitchen of my Aunt Colleen
from the kitchen of my Aunt Colleen
3/4 cup softened butter or margarine
1 1/3 cups packed brown sugar
1 teaspoon vanilla
2 eggs
2 1/4 cups flour
1 teaspoon baking soda
1/2 teaspoon salt
1 cup M&M plain candies, plus some to place on top
1 1/3 cups packed brown sugar
1 teaspoon vanilla
2 eggs
2 1/4 cups flour
1 teaspoon baking soda
1/2 teaspoon salt
1 cup M&M plain candies, plus some to place on top
Preheat the oven to 350 degrees Fahrenheit. Mix brown sugar, butter, vanilla, and eggs in a large bowl until well-blended. Combine the dry ingredients in a large bowl, then stir into the butter and sugar mixture. Stir in the M&M candies by hand, then drop by rounded tablespoonfuls about 3 inches apart onto a lightly greased cookie sheet. Press 3 to 5 more M&Ms onto each cookie if desired [do it - this makes the cookies look nicer and gives a little extra chocolate]. Bake until light brown, about 10 to 12 minutes. Cool slightly then remove to a wire rack to cool completely.
One suggestion - use an ice cream scoop/cookie dough scoop if you have one. This makes things so much easier.
I don't have any pictures of the finished product, but I think the cookie dough pictures look good enough.
21 December 2008
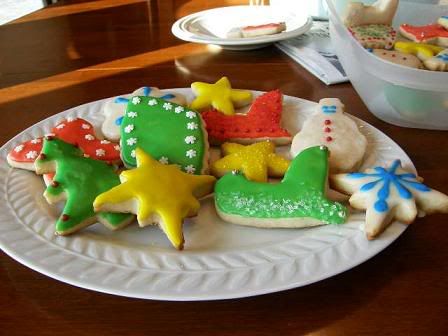
Christmas Cut-Out Cookies
I survived my second-to-last semester of college! I busted my ass this semester and hopefully it'll pay off, but now it's time for me to relax and enjoy myself...which means lots of baking! My mom and I already have a lengthy holiday baking list that includes kifli and apple pie. I was itching to bake since arriving home on Thursday, so I wasted no time and dove into some cut-out cookies.
I have so many memories of making sugar cookies with my mom when I was younger and I really have missed making them. I can't remember the last time we made some cut-outs and I knew I had to bring them back this year. As much as I enjoy a traditional sugar cookie, I wanted something different. I turned to my cookie book simply titled Cookies, which I purchased this summer but hadn't yet used. The recipe I selected was a sugar heart cut-out recipe, but different slightly from most sugar cookie recipes I've seen. I opted to add cinnamon to my cookies in order to add a little something extra and it was a great addition. The cinnamon adds a very faint flavor in the background and compliments these mild cookies quite well. The texture of the cookies is incredibly light and soft, which is exactly what I was looking for. I definitely recommend this to anyone looking for a go-to sugar cookie recipe!
Sugar Cookies
adapted from Cookies
3 cups all-purpose flour
1/2 teaspoon baking powder
1/2 teaspoon salt
1 cup butter, softened
1 cup sugar
1 1/4 teaspoon vanilla extract [I used my vanilla bean paste]
1/4 cup half-and-half
1 large egg + 1 large egg yolk
1/2 teaspoon cinnamon [that's an estimate - I eyeballed it]
Mix the flour, baking powder, cinnamon, and salt in a medium bowl. Beat the butter and sugar in a large bowl with an electric mixer on medium until creamy. Add the vanilla and half-and-half; beat to combine. Add the egg and egg yolk, beating until just blended. Mix in the dry ingredients gradually, scraping down the bowl after each addition.
Divide the dough in half. Press into disks, wrap in plastic wrap, and refrigerate for at least one hour (overnight would be preferable).
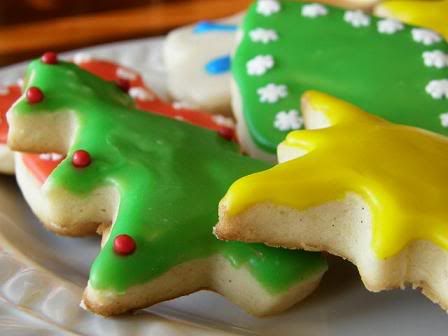
Preheat the oven to 350 degrees Fahrenheit. Line cookie sheets with parchment paper. Roll out one of the disks on a lightly floured surface to 1/4 inch thick. Cut out the cookies and transfer to the prepared cookie sheets, placing them 2 inches apart. Repeat with the remaining dough. Bake until just golden, about 12 to 15 minutes. Transfer to racks and let cool completely before frosting.
I wanted to find the perfect icing recipe, so I turned to allrecipes.com and found an awesome glaze. This glaze tends to set up between cookies, so make sure you stir it between uses. It dries hard enough for stacking cookies and stays vibrant and shiny after drying. I don't recommend using wax paper between the layers [only stack after completely dried!], as it tends to take away some of the color. Also, do not refrigerate after icing - this leads to condensation and it will ruin the icing.
Sugar Cookie Glaze
adapted from allrecipes.com
2 1/2 cups powdered sugar [add more if you'd like a thicker glaze]
2 tbsp light corn syrup
4 tbsp water
a splash of vanilla or almond extract will give the icing a little more "oomph" and I recommend that
food coloring of your liking
Mix 'em all up and go to town! I dipped a lot of mine, but if you make yours thick enough you can spread the icing. I also tried to do some piping but that was just a giant mess. You may be more successful with that than I was ;p


I have so many memories of making sugar cookies with my mom when I was younger and I really have missed making them. I can't remember the last time we made some cut-outs and I knew I had to bring them back this year. As much as I enjoy a traditional sugar cookie, I wanted something different. I turned to my cookie book simply titled Cookies, which I purchased this summer but hadn't yet used. The recipe I selected was a sugar heart cut-out recipe, but different slightly from most sugar cookie recipes I've seen. I opted to add cinnamon to my cookies in order to add a little something extra and it was a great addition. The cinnamon adds a very faint flavor in the background and compliments these mild cookies quite well. The texture of the cookies is incredibly light and soft, which is exactly what I was looking for. I definitely recommend this to anyone looking for a go-to sugar cookie recipe!
Sugar Cookies
adapted from Cookies
3 cups all-purpose flour
1/2 teaspoon baking powder
1/2 teaspoon salt
1 cup butter, softened
1 cup sugar
1 1/4 teaspoon vanilla extract [I used my vanilla bean paste]
1/4 cup half-and-half
1 large egg + 1 large egg yolk
1/2 teaspoon cinnamon [that's an estimate - I eyeballed it]
Mix the flour, baking powder, cinnamon, and salt in a medium bowl. Beat the butter and sugar in a large bowl with an electric mixer on medium until creamy. Add the vanilla and half-and-half; beat to combine. Add the egg and egg yolk, beating until just blended. Mix in the dry ingredients gradually, scraping down the bowl after each addition.
Divide the dough in half. Press into disks, wrap in plastic wrap, and refrigerate for at least one hour (overnight would be preferable).
Preheat the oven to 350 degrees Fahrenheit. Line cookie sheets with parchment paper. Roll out one of the disks on a lightly floured surface to 1/4 inch thick. Cut out the cookies and transfer to the prepared cookie sheets, placing them 2 inches apart. Repeat with the remaining dough. Bake until just golden, about 12 to 15 minutes. Transfer to racks and let cool completely before frosting.
I wanted to find the perfect icing recipe, so I turned to allrecipes.com and found an awesome glaze. This glaze tends to set up between cookies, so make sure you stir it between uses. It dries hard enough for stacking cookies and stays vibrant and shiny after drying. I don't recommend using wax paper between the layers [only stack after completely dried!], as it tends to take away some of the color. Also, do not refrigerate after icing - this leads to condensation and it will ruin the icing.
Sugar Cookie Glaze
adapted from allrecipes.com
2 1/2 cups powdered sugar [add more if you'd like a thicker glaze]
2 tbsp light corn syrup
4 tbsp water
a splash of vanilla or almond extract will give the icing a little more "oomph" and I recommend that
food coloring of your liking
Mix 'em all up and go to town! I dipped a lot of mine, but if you make yours thick enough you can spread the icing. I also tried to do some piping but that was just a giant mess. You may be more successful with that than I was ;p
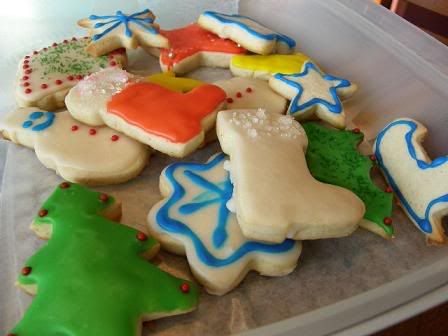
20 December 2008
Coming soon...
Christmas cookies! I already made my first batch, sugar cookies! Here's a teaser, but I'll post a full write-up and better photos tomorrow.

15 November 2008
Apologies [again]
Do I still have any readers? Did I ever have any readers? Well, if you're still there so am I! School is a nightmare right now. I may have a chance to do some blogging once I turn in my first term paper this coming Monday, but chances are that won't happen. I have Thanksgiving break quicly approaching which should involve my first pie from scratch and my stuffing! Now, just because the word "break" appears in that sentence doesn't mean I'll have free time. I have exams to study for and another paper to write during that time, so if I'm being honest here...I may not have the chance to blog again until the middle of December. So, thank you if anyone is still out there checking up on this and I'll eventually have more fun recipes to post.
23 October 2008
Baking for Breast Cancer Awareness
It's been a little over a month since I last posted and I apologize. School and work and interning and traveling have kept me incredibly busy. On top of having very little time, I'm having some computer issues which make it difficult for me to upload pictures and stay online for long periods of time. Anyway, let's move on...
I saw this blogging event on Foodgawker and immediately knew that I had to participate. Cilantro and Lime is hosting this event in order to raise awareness of breast cancer. Breast cancer is, worldwide, the second most common type of cancer and ranks fifth in cancer deaths. One very interesting fact concerning breast cancer is that it affects both men and women [well, maybe this is common knowledge but I didn't really expect it to be].
The reason I was so adamant about participating in this event is my experiences with cancer. My mom has spent quite a few years working in the billing office of a cancer center and, because of that, I have been able to spend my past 4 summers and winters helping around the office. So, for a number of years, I've been exposed to cancer in that sense. More directly, cancer has affected both sides of my family. My Uncle Wayne [my mom's oldest brother] was diagnosed with throat cancer about...4 or 5 years ago. This came as a huge blow to the family. How could this happen to Uncle Wayne? He doesn't drink, he doesn't smoke...he doesn't deserve this. My uncle sought treatment at the cancer center mom and I work at and, thank God, has been clear of cancer for a good 3 years or so. He goes back every year for a follow-up and so far, so good.
Sadly, our other family encounter with cancer does not have such a happy ending. Later during that same year that my Uncle Wayne was diagnosed, my Aunt Connie [my dad's oldest sister] was diagnosed with breast cancer. Again, we were all shocked. Two family members in the same year? Unbelievable. Aunt Connie was initially treated at the same cancer center and then went to receive treatments elsewhere. I never heard much else about how she was doing, mainly due to poor family relationships with that side of the family, and I guess I just assumed she was recovering. It wasn't until this past summer that things really went downhill, and fast. We got news that Aunt Connie was struggling and the treatments weren't working. To make a very long story somewhat shorter, she was eventually placed in hospice care. My dad spent every day over there and for at least a month I hardly saw my father. I was so amazed by his dedication and his willingness to do whatever Aunt Connie wanted. The cancer had spread to at least her bones and her lungs, and she soon could hardly speak. My Uncle Chad flew in from Florida and spent at least a month here, and all her brothers and sisters and her 5 children did all they could to make her comfortable. On August 9th, I returned home from a trip to Myrtle Beach and Bryce accompanied me [a friend of mine was getting married that day]. Around 2 in the morning on August 10th, I heard the phone ring and shortly after, my dad was up and in the kitchen. He knew this was going to be his last time with her and he spent that night at the hospice center. She passed away around 4:00 AM and her pain was finally gone.
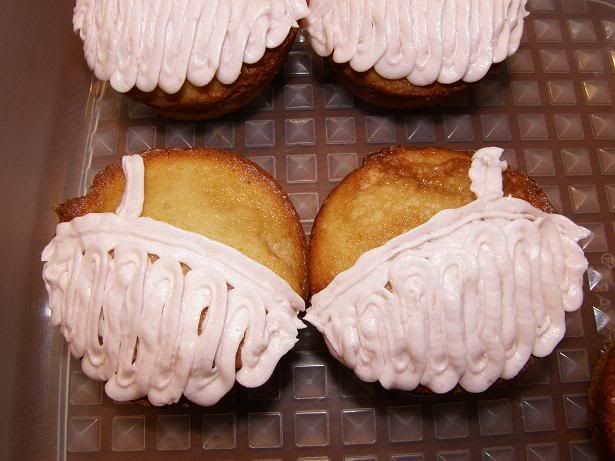
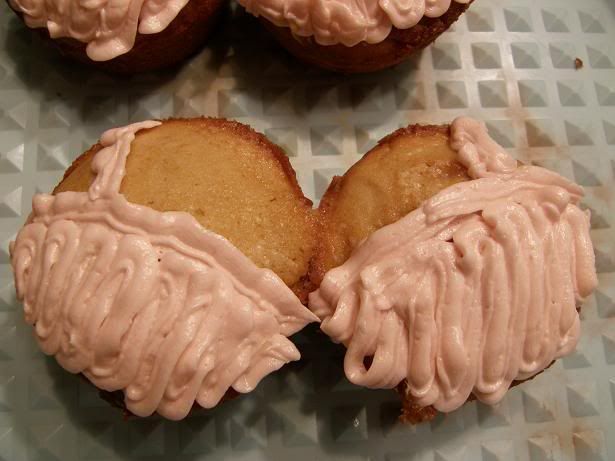
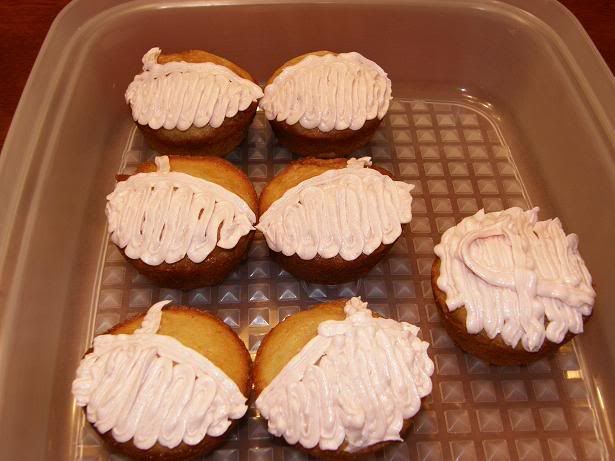
I apologize if that was too long or too personal, but that's my story and that's why I'm doing this. I wanted to bake something fun, something different. After some brainstorming with Bryce and Amy, I came up with cupcakes with pink frosting bras. I picked a recipe from our family Best of Cooking Light cookbook and frosted them with my favorite frosting recipe, tinted pink with my Wilton gels.
I'm slightly pressed for time, so I'll post a link to the recipe. The only changes I made were I omitted the breadcrumbs and I baked the recipe as cupcakes, so I checked on them after about 10 minutes and used my judgment past that point.
Brown Sugar Pound Cake
Frosting
1 cup milk 5 tablespoons flour 1 cup sugar
1 cup butter
1 teaspoon vanilla
In a saucepan, combine the milk and flour. Cook over low heat, stirring constantly until mixture thickens. Now, I wasn't sure how thick this meant, but you'll know. It gets really, really thick. Set aside to cool completely. Cream together butter, sugar, and vanilla until light and fluffy, then stir in cooled milk mixture. Beat until icing reaches a nice spreading consistency.
These cupcakes had a great texture: dense and moist. They were the perfect sweetness and I think the frosting complemented the cake nicely. I would definitely like to make this recipe again but perhaps in a loaf pan and with a glaze rather than frosting.
I saw this blogging event on Foodgawker and immediately knew that I had to participate. Cilantro and Lime is hosting this event in order to raise awareness of breast cancer. Breast cancer is, worldwide, the second most common type of cancer and ranks fifth in cancer deaths. One very interesting fact concerning breast cancer is that it affects both men and women [well, maybe this is common knowledge but I didn't really expect it to be].
The reason I was so adamant about participating in this event is my experiences with cancer. My mom has spent quite a few years working in the billing office of a cancer center and, because of that, I have been able to spend my past 4 summers and winters helping around the office. So, for a number of years, I've been exposed to cancer in that sense. More directly, cancer has affected both sides of my family. My Uncle Wayne [my mom's oldest brother] was diagnosed with throat cancer about...4 or 5 years ago. This came as a huge blow to the family. How could this happen to Uncle Wayne? He doesn't drink, he doesn't smoke...he doesn't deserve this. My uncle sought treatment at the cancer center mom and I work at and, thank God, has been clear of cancer for a good 3 years or so. He goes back every year for a follow-up and so far, so good.
Sadly, our other family encounter with cancer does not have such a happy ending. Later during that same year that my Uncle Wayne was diagnosed, my Aunt Connie [my dad's oldest sister] was diagnosed with breast cancer. Again, we were all shocked. Two family members in the same year? Unbelievable. Aunt Connie was initially treated at the same cancer center and then went to receive treatments elsewhere. I never heard much else about how she was doing, mainly due to poor family relationships with that side of the family, and I guess I just assumed she was recovering. It wasn't until this past summer that things really went downhill, and fast. We got news that Aunt Connie was struggling and the treatments weren't working. To make a very long story somewhat shorter, she was eventually placed in hospice care. My dad spent every day over there and for at least a month I hardly saw my father. I was so amazed by his dedication and his willingness to do whatever Aunt Connie wanted. The cancer had spread to at least her bones and her lungs, and she soon could hardly speak. My Uncle Chad flew in from Florida and spent at least a month here, and all her brothers and sisters and her 5 children did all they could to make her comfortable. On August 9th, I returned home from a trip to Myrtle Beach and Bryce accompanied me [a friend of mine was getting married that day]. Around 2 in the morning on August 10th, I heard the phone ring and shortly after, my dad was up and in the kitchen. He knew this was going to be his last time with her and he spent that night at the hospice center. She passed away around 4:00 AM and her pain was finally gone.
I apologize if that was too long or too personal, but that's my story and that's why I'm doing this. I wanted to bake something fun, something different. After some brainstorming with Bryce and Amy, I came up with cupcakes with pink frosting bras. I picked a recipe from our family Best of Cooking Light cookbook and frosted them with my favorite frosting recipe, tinted pink with my Wilton gels.
I'm slightly pressed for time, so I'll post a link to the recipe. The only changes I made were I omitted the breadcrumbs and I baked the recipe as cupcakes, so I checked on them after about 10 minutes and used my judgment past that point.
Brown Sugar Pound Cake
Frosting
1 cup milk 5 tablespoons flour 1 cup sugar
1 cup butter
1 teaspoon vanilla
In a saucepan, combine the milk and flour. Cook over low heat, stirring constantly until mixture thickens. Now, I wasn't sure how thick this meant, but you'll know. It gets really, really thick. Set aside to cool completely. Cream together butter, sugar, and vanilla until light and fluffy, then stir in cooled milk mixture. Beat until icing reaches a nice spreading consistency.
These cupcakes had a great texture: dense and moist. They were the perfect sweetness and I think the frosting complemented the cake nicely. I would definitely like to make this recipe again but perhaps in a loaf pan and with a glaze rather than frosting.
16 September 2008
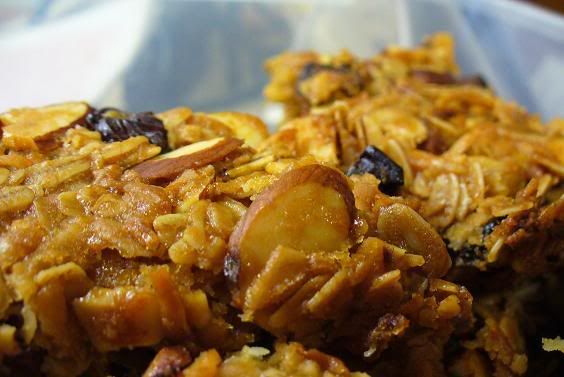
Granola Bars
Yes, I am still alive and baking. Sadly, school has started and my senior of college has not been kind so far. My days are jam-packed between classes, interning at an elementary school, and working two part-time jobs. I still find time to bake, using my friend Amy’s kitchen and my boyfriend’s kitchen, but I’m not quite finding the time to post. Honestly, I shouldn’t be posting this right now. I have to read a book for class tomorrow and haven’t quite opened it… Oh well, I survived my first Atypical Child Psychology exam [yikes!] and am rewarding myself with the revival of my blog!
Granola Bars
from Cathlin Cooks
1/3 cup flour
½ cup vegetable oil
¾ cup honey
¼ cup brown sugar
2-3 tablespoons peanut butter
1 cup shredded, unsweetened coconut
1 1/3 cups assorted nuts and seeds
1 1/3 cups assorted dried fruit, cut up to the size of sunflower seeds
Roughly chop nuts and fruit into pieces about the size of a sunflower seed. Place in a bowl with oats, coconut, and flour, and stir together until combined.
Slightly heat honey in a pot on the stove, then add sugar, peanut butter, and oil, and whisk together thoroughly. Pour wet into a well in the dry mixture and combine. If it doesn’t stick together well add more honey.
Dump into the prepared pan. Wet hands with cold water and using a spoon and hands, pack mixture flat into the pan.
Bake for 25 to 35 minutes. During baking, use spoon or spatula to press down mixture every 10 or 15 minutes. Allow to cool for 15 to 20 minutes after baking and then remove from pan. Using a sharp knife, cut into bars and store in an airtight container for up to two weeks.

Subscribe to:
Posts (Atom)

